Microsoft Word is an excellent tool for creating unique textual content, as it provides a diverse font selection for any purpose. However, there are cases when you need something truly exclusive to implement your idea. In this case, you might need to install additional typography style to Word on your PC or mobile device.
In this article, you will find out how to add new fonts to Microsoft Word on your device, whether you have Mac or Windows, iOS or Android. Keep reading to easily manage this pretty complex task and make your textual content more eye-catching and unique.
Table of Contents
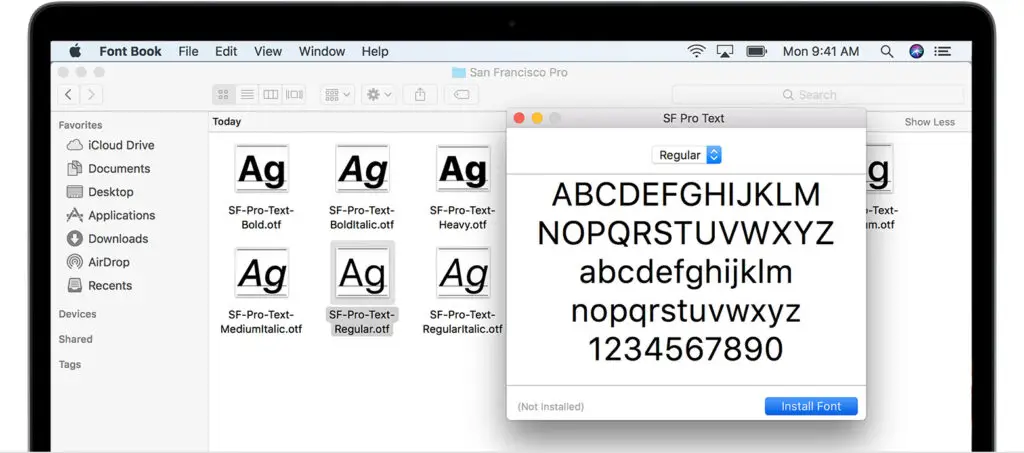
How to Add New Fonts to Word on Mac
To start applying new Word fonts on Mac, you should add them to the library first. Use the Font Book, a native Mac app for managing fonts on your Mac computer, to install fonts through the following method:
- Open Finder on your Mac.
- Locate the new font file and unzip it if necessary.
- Double-click the font file you want to add to the Font Book.
- Open the font preview window and click the “Install Font” button at the bottom of the window.
- Restart your Mac for the changes to become effective.
How to Install a Font to Word on Windows
To start using new fonts on Windows, you need to install them one of the following ways:
Method #1
- Open File Explorer on your computer and locate your new font (unpack the font if it’s in a ZIP file).
- Click the “Windows” logo or “Start” button in the bottom left corner of the screen, depending on your Windows version.
- Click the “Settings” icon and select the “Font Settings” option.
- Drag and drop your font file to the “Add fonts” section of the “Fonts” window.
Method #2
- Locate the new font in File Explorer.
- Double-click either the .ttf or .otf file, depending on which one is available.
- Open the font preview window and click the “Install” button on the top left corner of the screen.
- Confirm the install action in security settings if necessary.
Add a New Font to Microsoft Word for iOS
It can take you more time and effort to install new fonts on your Android device. Nevertheless, this guide can help you make it anyway:
- Open FX File Explorer.
- Locate your font file.
- Copy it in the upper right corner of the screen.
- Close FX File Explorer, find the MS Word app, and hold your finger on the file icon to make a menu pop up.
- Find the font directory by navigating to Files > Data > Fonts.
- Paste the font file inside the font directory.

Install New Fonts to Word on Android Devices
To add new fonts to iOS devices, you’ll need to install AnyFont from the App Store and then follow the next steps:
- Move the font file into your iCloud.
- Tap the font file in iCloud, then tap the ellipsis in the upper right corner of your screen.
- Make the iOS menu appear by clicking the “Export” button.
- Tap “Open In” and select “Import with AnyFont.”
- Tap your font file, then tap the large Aa icon to install the font.
Conclusion
To sum up, it is quite simple to add fonts to Microsoft Word, whether you use it on Android or iOS devices. With this simple step-by-step guide, you can install new fonts on Windows or Mac computers and mobile devices. Follow this tutorial to add fonts to Word on the device you need, and start using them now!